AEB Bracketing App
iPhone Bracketing App
ProCam App
$9.99 (iOS)
Note: This is an independent suggestion. ProPicFix is not affiliated with ProCam and does not earn anything if you buy or use that app. Other iPhone apps also offer rapid-burst exposure bracketing (AEB). Search for “rapid-burst exposure-bracketing iPhone apps” to compare options.
Automatic Exposure Bracketing (AEB) is a photography technique where 3 shots or more of the same scene are taken at different exposures. It is the only way to capture both a bright room and the view outside the windows. Set the 3 image exposures at EV(-2) dark, EV(0) middle, and EV(+2) bright. Professional editing software can then merge the images into one balanced photo.
- Press the AEB button on the secondary toolbar to select exposure bracketing.
- Long press the AEB button to set the exposure range. The parameter on the left in the EV number and the one on the right is the EV value. (EV 1 represents the first exposure bracket and EV 2 represents the second exposure bracket, and so on.)
- Set Brackets to (-2), (0), and (+2)
AEB Bracketing App
Android Bracketing App

Open Camera
Free (Android)
Note: This is an independent suggestion. ProPicFix is not affiliated with Open Camera and does not earn anything if you buy or use that app. Other Android apps also offer rapid-burst exposure bracketing (AEB). Search for “rapid-burst exposure-bracketing Android apps” to compare options.
Automatic Exposure Bracketing (AEB) is a photography technique where 3 shots or more of the same scene are taken at different exposures. It is the only way to capture both a bright room and the view outside the windows. Open Camera calls AEB Expo {}. One shutter press saves several original photos at different EVs. Do not use HDR mode. This will auto-merge the photos but not with high enough quality for real estate images.
Turn on Camera2 (needed for reliable AEB + RAW)
- Open Open Camera.
- Tap the gear.
- Camera API → Camera2 API. If Camera2 is missing or greyed out, your phone is limited; AEB may be slower or unavailable.
Set how many shots and how far apart
- Gear → Photo settings.
- Set Exposure Bracketing Stops — 3 shots at 2 stops → −2 / 0 / +2.
- Optional but best for merging later: Image format / photo format → DNG (RAW) or RAW+JPEG if offered.
Switch into AEB mode
- On the viewfinder, open the popup menu (three dots / “...”).
- Under Photo Mode, choose Expo {}. The mode name should show Expo {}, not HDR, NR, or STD.
You take the photos, and we will make them look professional!
Easy 4-Step Process
Load a 'Bracketing' App
Take Your Photos
Upload Image Files
Download Finished Photos
Single Listing
Process up to 32 photos. Includes merging of bracketed images, brightening of images, perspective correction, and enhanced window-views.
$75
total
Multiple Listings
3 or more properties up to 32 photos each. Includes merging of bracketed images, brightening of images, perspective correction, and enhanced window-views. (Contact ProPicFIx for pricing on larger numbers.)
$65
per listing
Specialty Editions
Special edits such as object removal, branding, labeling or highlights, day to dusk conversion.
$3
per photo
Camera Setup
Take all photos in landscape (horizontal) position. Flash off. Use of a tripod is highly recommended. This will stabilize the camera for the 2 seconds required for multiple exposure images. If handheld, work on a stable grip to keep your device very still for two seconds after tapping the shutter button. Use grid feature and leveling feature to assist proper centering and leveling of images. Clean lens with microfiber cloth. Use level feature.
Interior Photography
Camera Settings
Indoor photos should all be taken in wide angle mode. On most devices labeled as 0.5x zoom mode, which is about equivalent to a 14mm wide-angle lens. This is a good range for real estate photos. All photos will be taken in horizontal position. Flash off.
Interior Lighting
Preferably take photos during bright daylight while also avoiding any angles aiming directly toward the sun. Curtains and blinds should be in a traditional open position allowing optimum natural lighting. Turn on all interior lights, including decorative lighting and gas fireplaces.
Interior Environment
Clean and declutter. Ensure spaces are spotless and free of loose objects. Remove personal items, excess furniture, and unnecessary distractions to make rooms feel more spacious. Most staging is about object removal, but adding specific items can be helpful as well. Fresh flowers, table settings, and neatly arranged pillows can make the space more inviting. Make the beds, remove items from the sink area, and whatever you do . . . never forget to close the toilet covers!
Camera Aiming
Optimum interior camera height is between 4ft and 5ft, aiming parallel to the floor and ceiling. (fig.1) Generally, with 8ft to 10ft ceiling heights, the camera height should be the vertical midpoint between the floor and ceiling. The resulting image will include an equal amount of floor and ceiling. However, keep that standard 4-5ft height even for rooms with much higher ceilings. See figure.
Directional Tips
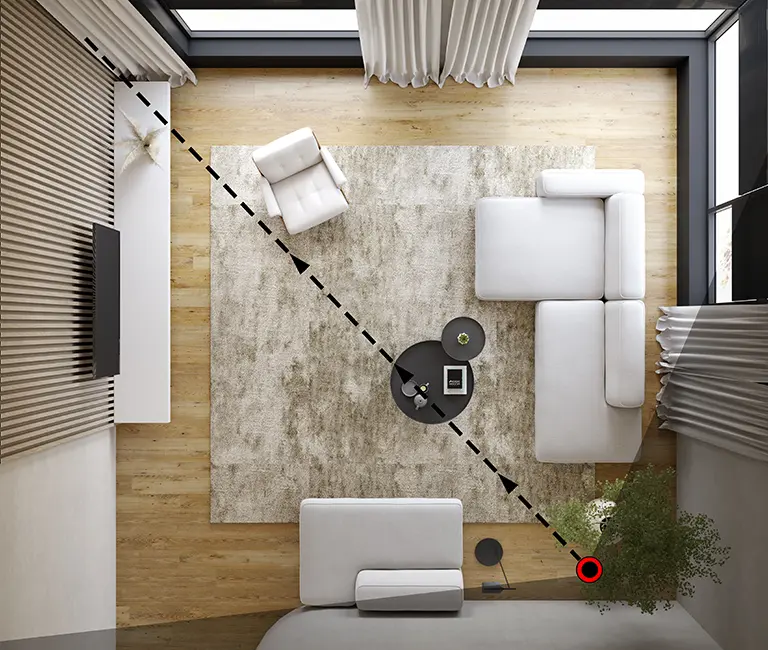
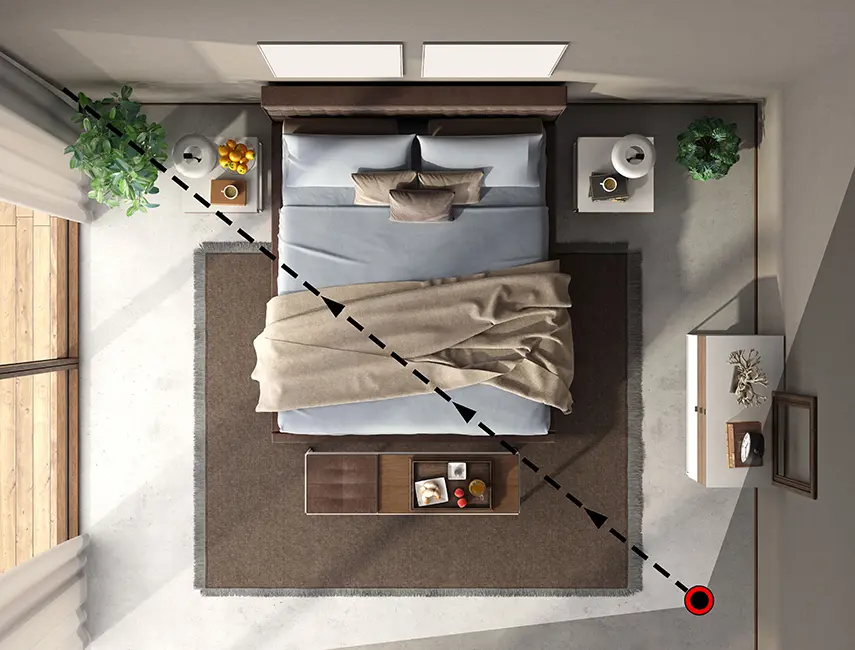
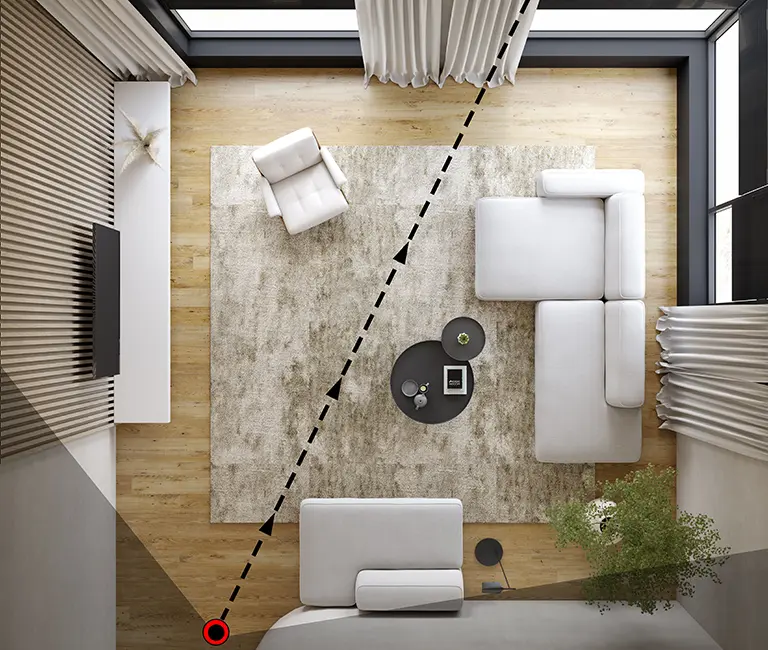
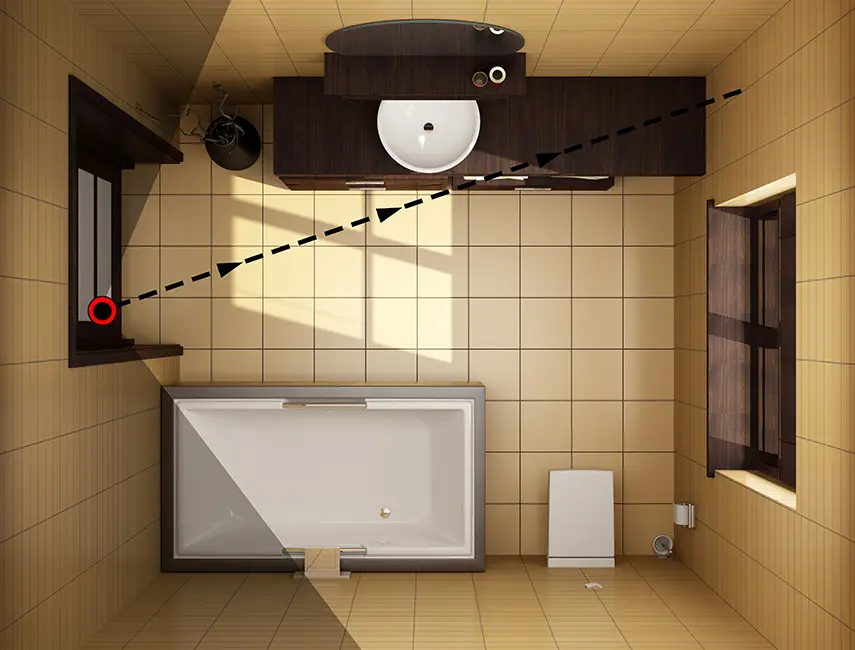
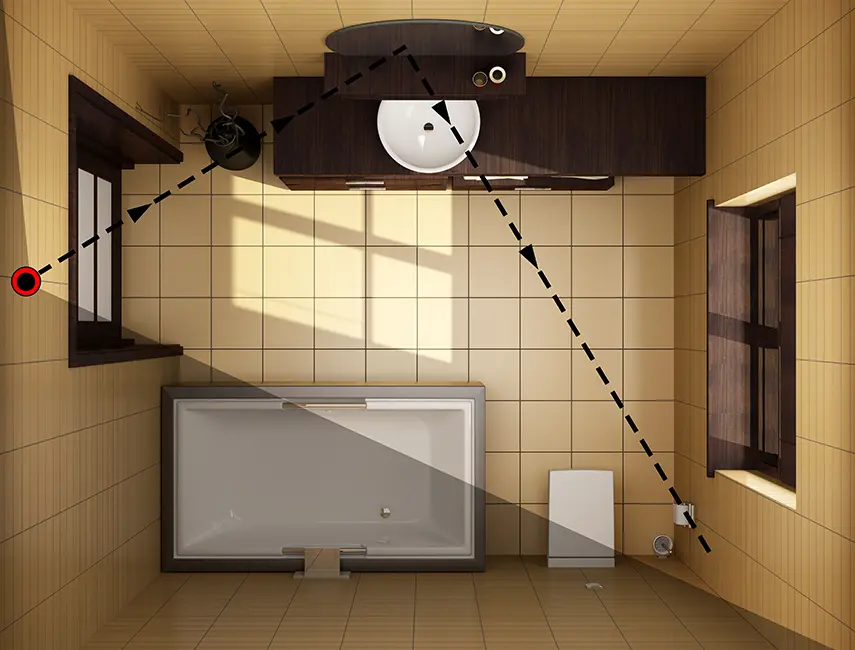
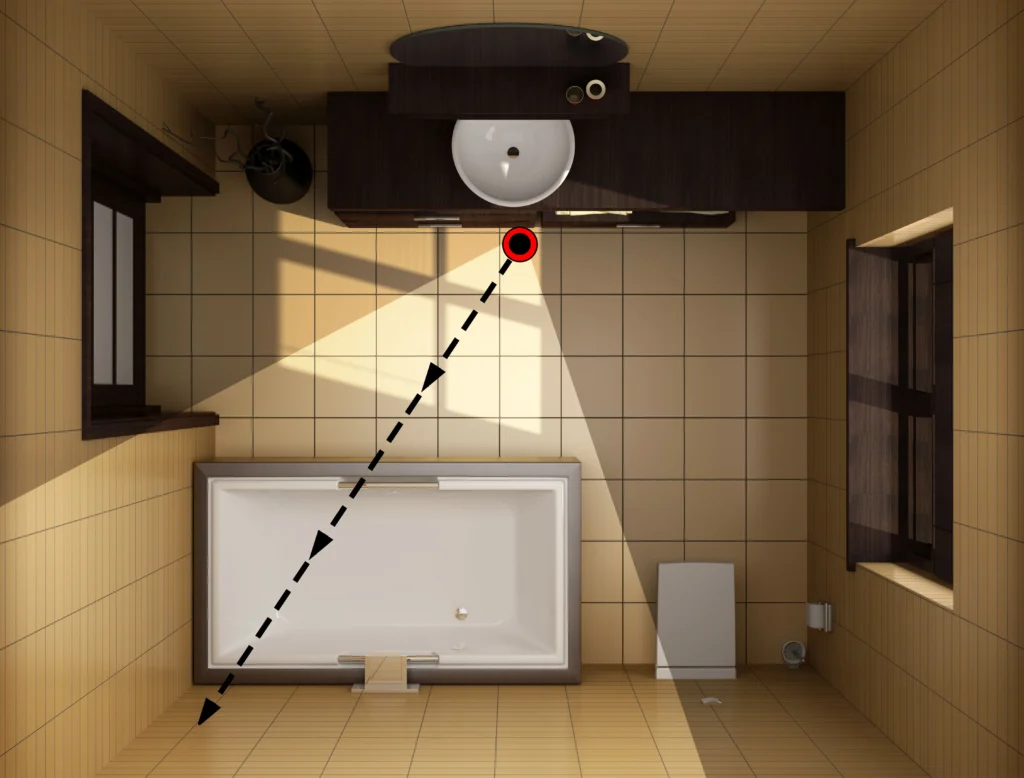
The most desirable angle is aiming from one corner of a room into the opposite corner. (fig.2, fig.3) Move the line of sight to avoid shooting the back of furniture. Also try to include as many windows as possible.(fig.4) A corner close to the walking path is often the best setup location. Remember, the purpose of the photo is to welcome you into the space – never to block your path.
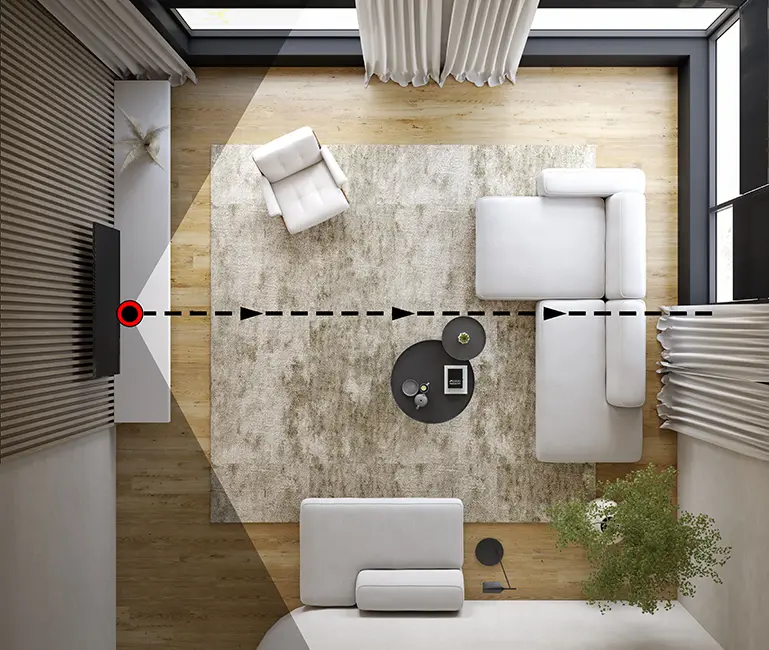
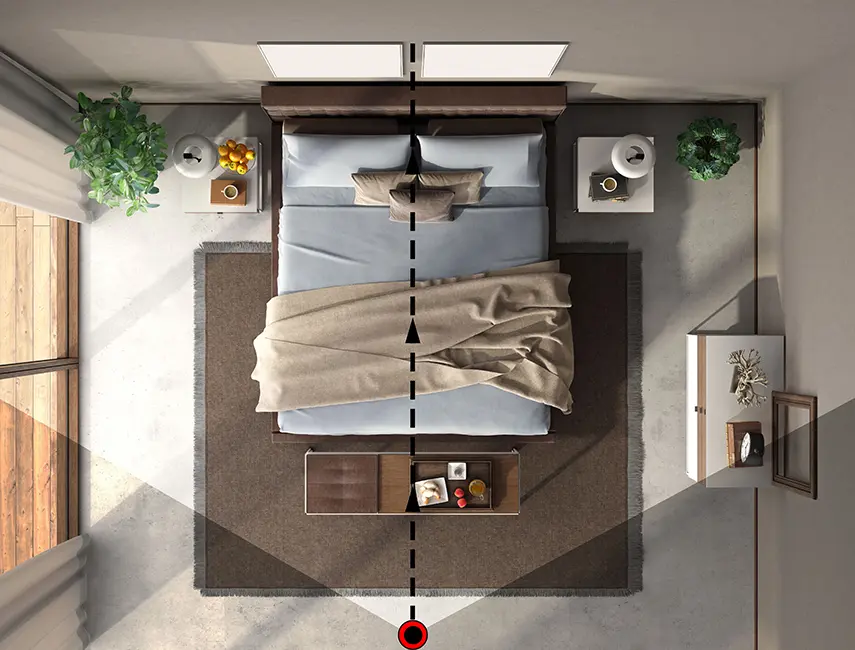
Another great angle can be pointing directly toward the center of a wall.(fig.5, fig.6) The wide angle should include the two adjacent walls offering another room enlarging perspective.
Small Rooms
Small rooms like bathrooms and walk-in closets can be the most difficult to frame. Often impossible to capture a proper proportion of the ceiling and floor like other rooms, there is a natural tendency to want to turn the smartphone into portrait orientation. Never do this – as it will cause the room to look very small. Do not be afraid to include a bit of the doorframe. One common technique of professional photographers is the ‘split-frame’ angle, combining the narrow room and narrow hallway for one wide image. Another unique shot can be strategically aiming toward the bathroom mirror at an angle that shows more of the room.
Key Features
Photographing a balcony view or stairway view are rare cases where the smartphone will be pointing down rather than level. Close-up photos of specific features like fireplaces, farmhouse sinks, barn doors, or high-end fixtures and appliances can be a great visual addition for a property listing. These unique snapshots are the only interior photos that can be better in 1x standard zoom rather than the 0.5x wide angle.
Step Back
Distortion levels – or how far out-of-vertical the lines toward the edge of the frame are distorted – will vary by device. But keep in mind distortion correction will essentially clip the top corners of the room. To compensate, after framing the intended target in your viewer screen, moving back a couple feet further (when possible) to allow for distortion correction is the best practice.
Practice a few shots before beginning your first property to familiarize yourself with the basic setup and process.
Take Extra Photos. Try different perspectives and decide later which are worthy of editing for the listing. Allow yourself some solid choices before uploading your photo set to propicfix.
Exterior Photography
Lighting
A clear sunny day is generally preferred – with the sun at its highest point for less shadowing. The best photos will be with the sun behind you. Try to time it so the sun hits the front of the property. Always include the important curb appeal shot with the front yard and/or entryway.
Camera
Nearly all exterior photos should be taken in standard 1x zoom mode rather than wide-angle 0.5x as was used for interior photos. Only use wide-angle when it is entirely necessary to frame the entire structure or capture deck and patio shots.
Camera Aiming
Unlike indoor photos – height can be quite variable for outdoor photography. Take photos from knee level to as high as your arm will reach - decide later which look best. Highlight deck and patio views from multiple perspectives. Trees and obstacles will dictate which angles are available. Always be sure to get one straight-on shot of the front of the house most likely to be used for your listing cover photo.